
Note: As an Amazon associate, I may earn from qualifying purchases.
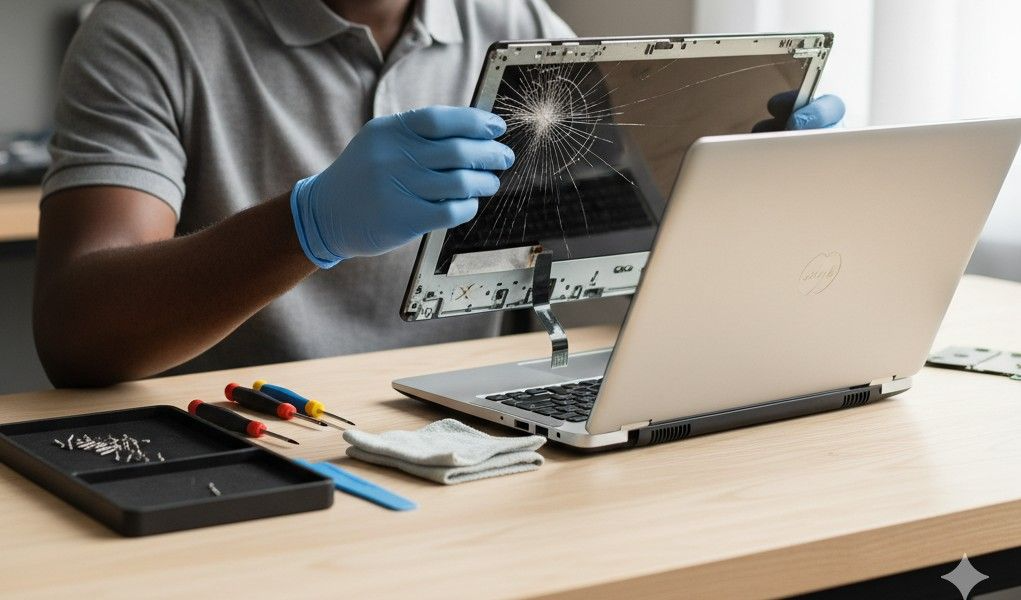
Laptop screen repair tops the list of common hardware fixes that every laptop owner eventually faces. Your laptop screen is the window to your digital world. When it cracks, flickers, or dies, your productivity stops. Many people panic and rush to expensive repair shops. Others attempt DIY fixes without proper diagnosis and make things worse.
This guide takes a different approach. You’ll learn to diagnose first, then repair smart. We’ll explore the true costs of fixing your screen. You’ll discover professional secrets that save time and money. Most importantly, you’ll make an informed decision about whether to fix it yourself or hire a pro.
Quick Laptop Screen Repair Checklist
- Diagnose your screen issue: cracked glass, flickering display, or dead pixels
- Gather the right tools: guitar pick, Phillips screwdriver, spudger
- Source a compatible replacement screen using your laptop’s exact model number
- Choose between DIY repair ($50-150, 2-4 hours) or professional service ($150-400, 1-2 days)
- Test thoroughly before reassembling completely
Understanding Common Laptop Screen Problems
Your laptop screen can fail in several distinct ways. Each problem has unique causes and solutions. Knowing the difference saves you hundreds of dollars.
Cracked or Shattered Screens
Physical damage creates the most obvious screen problem. You’ll see spider-web cracks spreading across the display. Sometimes the screen still works beneath the cracks. Other times, portions of the display turn black or show colored lines.
Cracked screens always need replacement. No amount of software troubleshooting will fix broken glass. The LCD panel beneath the glass is usually damaged too. This makes the entire screen assembly unusable.
Flickering or Dim Displays
Flickering screens pulse between brightness levels. Sometimes they go completely dark, then light up again. Dim screens stay consistently darker than normal, even at maximum brightness settings.
These issues often stem from failing backlight components. Your screen’s backlight illuminates the LCD panel from behind. When it fails, you get flickering or dimness. Sometimes a loose cable connection causes similar symptoms.
Dead Pixels and Screen Discoloration
Dead pixels appear as tiny black dots that never change. Stuck pixels show constant red, green, or blue colors. Screen discoloration creates patches of wrong colors across your display.
A few dead pixels might not justify laptop screen repair. However, clusters of dead pixels or spreading discoloration signal deeper problems. These issues usually indicate LCD panel degradation.
Blank Screen with Power On
Your laptop powers on normally. You hear fans running and see indicator lights. But the screen stays completely black. This frustrating problem has multiple potential causes.
A failed screen, loose cable, or graphics card issue could create this symptom. You need a systematic diagnosis to identify the real culprit. Testing with an external monitor helps narrow down the cause.
The Diagnosis-First Approach to Laptop Screen Repair
Smart laptop screen repair starts with an accurate diagnosis. Skipping this step wastes money on the wrong parts. It also wastes hours pursuing incorrect solutions.
Your Screen Diagnosis Checklist
Follow this systematic checklist before ordering any parts:
Step 1: Inspect for Physical Damage. Look closely at your screen under bright light. Check for cracks, even tiny ones. Run your finger gently across the surface. You should feel any breaks in the glass. Take photos from different angles to document the damage.
Step 2: Test with External Monitor. Connect your laptop to an external monitor or TV. If the external display works perfectly, your laptop screen has the problem. In case both displays show issues, your graphics card might be failing instead.
Step 3: Check Cable Connections. Gently open and close your laptop lid several times. Watch for flickering or changes in the display. Move the screen to different angles. If the picture changes with movement, you likely have a loose cable connection.
Step 4: Adjust Brightness Settings. Press your laptop’s brightness keys repeatedly. Try both increasing and decreasing brightness. Boot into your BIOS setup (usually by pressing F2 or Delete during startup). If the BIOS screen appears clearly, your operating system might be the problem, not your screen.
Step 5: Look for Backlight Issues. Shine a flashlight at an angle onto your dark screen while the laptop runs. Can you faintly see images or text? If yes, your backlight failed, but the LCD panel still works. This specific problem sometimes allows a cheaper repair.
Creating Your Diagnosis Flowchart
Here’s a simple decision tree for laptop screen repair diagnosis:
Start Here: What do you see?
Visible cracks or shattered glass?
- Yes → Physical damage. Screen replacement needed. Go to Section: Sourcing Replacement Screens.
- No → Continue.
Screen completely black?
- Yes → Test with external monitor.
- External monitor works → Failed laptop screen. Shine flashlight test.
- See faint images → Backlight failure.
- See nothing → Complete screen failure.
- External monitor also fails → Graphics card problem, not screen.
- External monitor works → Failed laptop screen. Shine flashlight test.
- No → Continue.
Flickering or dimming?
- Yes → Test lid movement.
- Changes with movement → Loose cable connection.
- No change with movement → Failing backlight or inverter.
- No → Continue.
Dead pixels or discoloration?
- Few scattered pixels → Acceptable, no repair needed.
- Many pixels or spreading areas → LCD panel degradation, replacement recommended.
This flowchart guides you to the right solution. Print it out and keep it handy during your diagnosis process.
DIY Laptop Screen Repair: The Real Costs
DIY laptop screen repair appeals to many people. The potential savings look attractive. But hidden costs often surprise first-time fixers.
Money Costs: Parts and Tools
Replacement Screen ($50-200). Screen prices vary dramatically by laptop model. Common models like Dell Inspiron or HP Pavilion have cheaper screens. Gaming laptops and premium ultrabooks cost more. Always buy from reputable suppliers like LaptopScreen.com.
Essential Tools ($15-30). You need specific tools for safe laptop screen repair. A guitar pick works perfectly for prying plastic bezels without scratching. Electronics screwdriver sets with magnetic tips prevent lost screws. Plastic spudgers protect delicate ribbon cables.
Optional but Helpful ($20-50). Anti-static wrist straps protect sensitive components. Double-sided adhesive tape secures the new screen bezel. Screen cleaning solution and microfiber cloths ensure a spotless final result.
Total DIY Investment: $85-280
Time Costs: The Hidden Expense
Money isn’t your only investment in DIY laptop screen repair. Time costs often exceed expectations.
Research and Learning: 2-4 Hours. Finding the correct replacement screen takes time. You’ll watch multiple YouTube tutorials. You’ll read forum posts about your specific laptop model. This research phase is crucial but time-consuming.
Actual Repair Work: 2-3 Hours. First-time repairs always take longer than expert videos suggest. You’ll work slowly to avoid mistakes. Careful disassembly prevents breaking plastic clips. Testing the new screen before final assembly adds extra time.
Potential Troubleshooting: 1-4 Hours. Sometimes the first screen you order arrives defective. Other times you damage a cable during installation. Troubleshooting these issues extends your project timeline significantly.
Total Time Investment: 5-11 Hours
Risk Factors in DIY Repair
DIY laptop screen repair carries real risks. Understanding them helps you decide if it’s worth attempting.
You might break fragile ribbon cables during disassembly. These cables cost $20-50 to replace but add frustration. Some laptop models use adhesive-bonded screens instead of screw-mounted ones. These models require heat guns and create higher damage risk.
Warranty considerations matter too. Opening your laptop usually voids any remaining manufacturer warranty. If your laptop is under warranty, manufacturer repair costs nothing. Always check your warranty status before starting DIY repairs.
Professional Laptop Screen Repair: What You’re Really Paying For
Professional laptop screen repair costs more upfront. But you’re buying more than just a fixed screen.
Service Costs Breakdown
Local Repair Shop ($150-300). Independent repair shops offer the best value for laptop screen repair. They charge for the replacement screen plus labor. Most complete repairs in 1-2 business days. You get a service warranty, typically 30-90 days.
Manufacturer Service ($250-500). Dell, HP, and Lenovo service centers charge premium prices. However, they use genuine OEM parts. Service quality is usually excellent. Turnaround times range from 3-7 business days with shipping.
Authorized Repair Centers ($200-400). Best Buy Geek Squad and similar services fall in the middle. They offer convenience and brand recognition. Wait times vary from same-day to one week. Service warranties typically last 90 days.
The Value Proposition
Professional laptop screen repair eliminates your time investment. You drop off the laptop and pick it up fixed. No research, no tool buying, no risk of damaging other components.
Professionals diagnose accurately on the first try. They spot problems you might miss. For example, a cracked screen might also have damaged hinge mounts. A pro identifies and fixes both issues simultaneously.
You also get accountability. If the repair fails within the warranty period, they fix it free. DIY repairs offer no such protection. One mistake means buying another screen at full price.
When Professional Repair Makes Sense
Choose professional laptop screen repair in these situations:
- Your laptop costs over $1,000 new. High-end devices deserve professional care. The risk of DIY damage isn’t worth the potential savings.
- You lack technical confidence. Disassembling laptops requires patience and spatial reasoning. If you’ve never opened electronics before, hire a pro.
- Your time is valuable. If you bill $50+ per hour professionally, hiring a repair service saves money. Your 8 hours of DIY time equals $400 in lost billable hours.
- You need fast turnaround. Many shops offer same-day or next-day service. DIY repairs take days when you factor in shipping times for parts.
Insider Tips for Successful Laptop Screen Repair
These lesser-known tips come from years of repair experience. They’re rarely mentioned in basic tutorials.
Sourcing Compatible Replacement Screens
Finding the right replacement screen causes the most DIY failures. Here’s the foolproof method:
Never search by laptop model name alone. The same model laptop often uses different screens across production years. You need the screen’s exact part number.
Find your current screen’s part number printed on its back. You must partially disassemble your laptop to see it. Look for a sticker with numbers like “LP156WH4-TLA1” or “B156XTN03.1”. This number identifies the exact panel type.
Search online retailers using this specific part number. Buy from established sellers with good return policies. LaptopScreen.com, Replacebase.com, and Screen Country are reputable options. Amazon third-party sellers often ship wrong screens.
Verify specifications match exactly. Check resolution (1366×768 vs 1920×1080), backlight type (LED vs CCFL), and connector type (30-pin vs 40-pin). One wrong specification makes the screen incompatible.
The Guitar Pick Technique
Plastic laptop bezels snap into place with hidden clips. Prying them open without damage requires finesse. Standard screwdrivers scratch and crack plastic.
Guitar picks offer the perfect solution for laptop screen repair. Their flexibility and thin profile slide between bezel and chassis smoothly. They’re firm enough to release clips but soft enough to prevent damage.
Use medium-thickness picks (0.73mm to 0.88mm work best). Start at a corner and work gradually around the perimeter. Listen for clips releasing with soft pops. Never force anything. If a section won’t release, look for hidden screws you missed.
Keep several picks handy. They occasionally break under pressure. Having backups prevents frustrating delays mid-repair.
Cable Connection Secrets
Ribbon cable connections cause most post-repair failures. These delicate connections require specific handling.
Every ribbon cable uses a locking connector. The locks come in two types: flip-up or slide-out. Examine the connector carefully before touching it. Pulling on a locked cable damages it permanently.
Flip-up locks have a thin colored bar that hinges upward. Gently lift this bar before removing the cable. It should move easily. Forced lifting means you’re pushing the wrong part.
Slide-out locks have side tabs that pull outward slightly. The cable then slides straight out. Never pull at an angle. Angled pulling bends pins inside the connector.
When connecting the new screen, ensure the cable sits completely flat in the connector. No wrinkles, no twisted sections. Close the lock firmly but gently. The cable should resist gentle tugging.
Testing Before Final Assembly
Never fully reassemble your laptop before testing the new screen. This rookie mistake costs hours of wasted work.
Connect the new screen and lay it face-down on the keyboard. Power on the laptop without screwing anything down. Watch for proper brightness, even colors, and no flickering.
Run through several test screens. Display pure white, pure black, and primary colors. These tests reveal dead pixels or connection issues. Website “deadpixelbuddy.com” offers free test patterns.
Try the brightness controls. Open and close the lid several times. Verify the screen responds correctly to sleep mode. These functional tests catch problems before you waste time on final reassembly.
If everything works perfectly, power down and complete the assembly. If you find issues, troubleshoot with easy access to connections. Testing first saves enormous frustration.
Magnetic Screw Management
Laptop screen repair involves dozens of tiny screws. Losing even one creates problems. Different screws go in different positions. Mixing them up causes threading issues.
Use a magnetic project mat designed for electronics repair. These mats have numbered sections. Photograph the mat with your phone after removing each set of screws. The photo shows which section contains which screws.
Alternatively, use a magnetic parts tray. Draw a simple laptop outline on paper. Place screws next to their removal location on the diagram. This visual system prevents confusion during reassembly.
Never use regular bowls or cups. Screws roll, fall, and disappear into carpet fibers. Magnetic tools keep everything organized and accessible.
Special Considerations for Different Laptop Types
Not all laptops follow the same repair process. Design variations affect difficulty and approach.
Ultrabooks and 2-in-1 Laptops
Modern thin laptops create unique challenges for laptop screen repair. Many use adhesive bonding instead of screws. You need a heat gun to soften adhesive before removal.
Work slowly and evenly when applying heat. Excessive heat damages LCD panels. Keep the heat gun moving constantly. Test adhesive softness frequently with a guitar pick.
Some 2-in-1 devices integrate the motherboard with the screen assembly. These designs make DIY repair nearly impossible. Professional service becomes the only practical option for such models.
Gaming Laptops with High-Refresh Screens
Gaming laptop screen repair requires extra attention to specifications. High-refresh-rate panels (120Hz, 144Hz, 240Hz) cost significantly more. They also require compatible cables and connectors.
Verify your replacement screen’s refresh rate matches the original exactly. Using a standard 60Hz panel in a 144Hz laptop works but wastes the laptop’s capabilities. You’ll notice degraded gaming performance.
Color accuracy matters for gaming and content creation. Cheaper replacement screens often have worse color gamut. Read reviews before purchasing to avoid disappointing downgrades.
MacBook Screen Replacement
MacBook screen repair deserves special mention. Apple designs make DIY repair extremely difficult. Recent MacBooks integrate screens with other components in ways that require specialized tools.
MacBook Airs and Pros from 2016 onward often need an entire top case replacement. You can’t simply swap the LCD panel. This design drives up both DIY and professional repair costs significantly.
For MacBooks, professional repair often makes more financial sense. Apple’s repair prices are high, but independent Apple-certified technicians offer competitive rates. They have the specialized tools and experience these repairs demand.
Common Laptop Screen Repair Mistakes to Avoid
Learning from others’ mistakes saves you pain. These errors appear in DIY laptop screen repair attempts constantly.
Ordering Screens Before Diagnosing
Many people assume a black screen means a dead LCD. They order expensive replacements unnecessarily. Sometimes the backlight failed, which is a cheaper fix. Other times, the graphics card caused the problem, not the screen.
Always complete the diagnosis first. Confirm the screen itself has failed. Verify no simpler solutions exist. Rushed ordering wastes money on parts you don’t need.
Excessive Force on Plastic Components
Laptop plastics break easily under force. Impatience causes cracked bezels and snapped clips. These cosmetic damages detract from your laptop’s value.
Go slow. If something doesn’t come apart easily, you’re missing a hidden screw or using the wrong technique. Watch model-specific tutorials before attempting removal. Ten extra minutes of research prevents permanent damage.
Static Electricity Neglect
Winter air or synthetic carpets create static electricity. One static discharge fries sensitive laptop components. Your motherboard, RAM, or new screen can die instantly from static.
Always use an anti-static wrist strap during laptop screen repair. Connect it to unpainted metal on the laptop’s chassis. Work on wood tables, never carpet. These precautions cost pennies but prevent expensive damage.
Skipping Cable Inspection
Used or refurbished replacement screens sometimes arrive with damaged cables. Installing without inspection wastes your time. You’ll complete the entire repair, then discover the screen doesn’t work.
Inspect your new screen before installation. Look for kinked cables, broken connectors, or visible damage. Test the screen if possible before full installation. Reputable sellers accept returns for defective parts, but only if you identify issues quickly.
Forgetting Screw Photography
Laptop internals contain many screw types and sizes. They’re not interchangeable. Wrong screws strip threads or don’t tighten properly.
Photograph each step of disassembly with your smartphone. Capture screw locations before removing them. These photos serve as your reassembly guide. They prevent the common “extra screws” problem after reassembly.
Making Your Final Decision: DIY or Professional?
You’ve diagnosed your screen problem. You understand the costs and processes. Now make an informed choice about laptop screen repair.
Choose DIY When:
You have 5+ hours of free time in the next week. The repair isn’t urgent. You can tolerate delays if problems arise.
Your laptop costs less than $600 new or refurbished. The lower value reduces the stakes. A mistake hurts less financially.
You enjoy learning new technical skills. The process interests you beyond just fixing the problem.
You’ve successfully completed electronics repairs before. Prior experience dramatically increases success rates.
You found the exact replacement screen for under $100. The lower cost justifies the time investment.
Choose Professional When:
Your laptop costs $800 or more. Professional service protects your investment.
You need your laptop daily for work. Downtime costs you money or creates significant inconvenience.
You’ve never disassembled electronics. First-timers face higher failure rates.
Your laptop has unusual design features. Thin ultrabooks, 2-in-1 devices, and MacBooks demand professional expertise.
You found estimates under $250 for professional service. The time you save justifies the cost difference.
Final Remarks: Your Path to a Fixed Screen
Laptop screen repair doesn’t need to be overwhelming. Systematic diagnosis reveals your exact problem. Understanding true costs helps you choose wisely between DIY and professional repair.
If you go the DIY route, use the insider tips shared here. Source the exact correct screen using part numbers. Use a guitar pick for safe disassembly. Test thoroughly before final reassembly. Take your time and photograph everything.
If you choose professional service, select a reputable repair shop. Read reviews and ask about warranties. Understand what you’re paying for: expertise, speed, and accountability.
Your laptop screen problem has a solution. You now have the knowledge to fix it right. Whether you grab your tools or find a trusted repair shop, you’re ready to restore your laptop to full function.
Don’t let a damaged screen hold you back. Take action today. Your laptop deserves a clear, bright display. Now go make it happen.